יום שבת, 14 בפברואר 2015

איך עושים חותם גליל?

ניצלנו היום שעה פנויה בירושלים במוזיאון ארצות המקרא. המוזיאון הזה גדוש באלפי מוצגים מעניינים, שהתישו אותי במהרה. אני צריך בשביל מוזיאון כזה כמה ימים... (תמונות בתגובות)
הנה מה שתפס אותי: חותמות גליליות, שכאשר מגלגלים אותם על חימר רך (לפני שריפה) מקבלים תבליט מורכב ויפהפה (תלוי באיכות החותם). החותמות האלו שימשו כתעודת זהות. הן היו מזהות כתבים, סחורות ואף את האנשים שנשאו אותן.
איך מכינים חותם כזה? אתם צריכים ליצור גליל אבן, לקדוח חור במרכזו, ואז לחרוט בו דוגמא משוכללת ויפה של שקערוריות, שייצרו תבליטים בחימר. אין לכם נייר, אין לכם עפרונות, אין נייר קופי - תתמודדו.
החלטתי לנסות להכין אחד כזה (התמונה מויקיפדיה).


כצעד ראשון החלטתי להתמקד בשאלה איך מעצבים את הדוגמא על הגליל. השארתי את העניינים המסובכים יותר של ייצור גלילי אבן וחריטה באבן קשה לשלב מאוחר יותר.
תמי הציעה להשתמש בגירי מדרכה בתור הגלילים. אלה גירים עבים במיוחד, בקוטר שני ס"מ. החלטתי להשתמש בפלסטלינה כתחליף חימר. הכנתי את כלי החריטה ממסמר פלדה. עיצבתי לו ידית מפלסטיק-פלסטלינה (פלסטיק שנמס במים חמים, ניתן לעיצוב כמו פלסטלינה ומתקשה במים קרים). במוזיאון נאמר שאומני החותמות השתמשו בלהבי צור. נשמע לי קשה מאוד...
את החריטה הראשונה עשיתי ביד חופשית. בחרתי דגם גאומטרי פשוט של קווים אלכסוניים והוספתי את הפיל המרובע שלי. החריטה בגיר קלה מאוד, כי הוא רך מאוד. לעומת זאת, קל מאוד גם לטעות, כי כאשר הכלי מחליק בטעות, הוא משאיר חריטה בגיר.
הנה חותם הגליל הראשון שלי, וההטבעה שהשאיר על פלסטלינה:


תמי עשתה חותם משלה, בנושא ים. הנה היא מטביעה את חותמה:


במוזיאון הסבירו שאמני החותמות שכללו את הטכניקה שלהם במשך שנים. אולי עוד כמה שנים אוכל ליצור חותמות יפות כמו שלהם, או כמו של תמי.

יום שני, 21 באפריל 2014

Learning Creative Learning - Week 5 - Tinkering with Keyboards

Goal: a home-made MaKey-MaKey

This week's assignment was to tinker with something I hadn't done before. The videos of this week showed "MaKey MaKey" - a small controller that attaches to the computer via USB and allows you to connect conductive stuff to various keyboard keys and activate them creatively. I decided to try and build one myself.

The initial thought was to hack a keyboard into a MaKey-MaKey, so I started out by looking for a keyboard no one needed. My neighbor Keren had one, which was partially working after a little coffee spilling accident a while ago. Some keys functioned, others didn't.

Taking the keyboard apart

I started by taking the keyboard apart. The keyboard is made of a tray that holds all the parts, an upper frame that includes all the keys, a rubber or silicon dome sheet, three plastic sheets with printed circuits, a printed circuit board (PCB) that holds the controller and some other functions and a USB cable.


The plastic keys have a moving range of a couple of millimeters. When the key is pressed down, it presses the rubber/silicon dome down, and a hard tip in the rubber/silicon dome is pressing a conductive material printed on the top plastic sheet down, to make contact with the conductive material on the lower sheet, and by that closing a circuit - see diagram below.


My initial thought was to hack the keyboard there, meaning, attach wires to the exact points where the keys press against the conductive material. But, this was not working out, as I did not have a good way to attach the wires to those particular spots. I had to find a better way.

Exploring the keyboard matrix

If each key was attached directly to the computer, keyboard cables had to be pretty thick, having to hold one wire per key + one wire for ground (to close the circuit). But keyboards work differently. They use a matrix of wires, so that each key belongs to a row (common to other keys, and to a column, also common to other keys. A micro controller constantly scans the columns, and determines which row is active in each column, and by so it can calculate which keys are pressed. There is a clear explanation here: http://www.dribin.org/dave/keyboard/one_html

In the keyboard I have there are 17 columns and rows, which sum up to 289 combinations.


I took out the PCB from the keyboard, connected it to my computer's USB port, opened a notepad program and started exploring the keyboard matrix by connecting different rows and columns and observing what happens on screen. For example, when I connected the first row with the fifth column, I got the letter "e" printed on screen. I collected a few of these combinations.

Building the home-made MaKey-MaKey

So now I had what I needed for building the prototype. The design was to use the PCB as-is, including its USB connector, solder wires row #1 and a few wires to specific columns, for which I had already knew the combinations and the output they produce (e.g. "e", "l", etc.).

Soldering was not easy - the solder did not stick well to the rows and columns connectors. What I eventually did was to drill tiny holes through the connectors and soldered the wires into these holes.


Using Scratch to do stuff

Seeing letters printed on screen is nice, but I wanted the hack to do something more exciting. So I added a Scratch program to respond to the various letters received from the hack by playing sounds and doing stuff.


Trying out the home-made MaKey-MaKey

I invited my son and his friend to try out the hack. They liked it and started to experiment. Here are a couple of videos we shoot:


יום שני, 24 במרץ 2014

Learning Creative Learning - Week 1 Activity - Gears of my Childhood

Introduction

I am taking the online MIT Media Lab course "Learning Creative Learning". Week 1's activity was based on a short text by Seymour Papert titled "Gears of My Childhood". In this text, Papert describes his early fascination with gears, and how it laid a cognitive foundation that was later used for grasping concepts in math. Papert ties this to Piaget's concept of "Assimilation" - a cognitive process in which new knowledge is digested using existing cognitive models, or structures. Papert claims that the cognitive aspect should be accompanied by an emotional aspect of learning, which might explain motivation to learn. In the activity, we were asked to write about an object from our childhood that interested and influenced us.

I chose three such objects: mechanical Lego, flint stone tools and my first computer.

Mechanical Lego

These are the gears of MY childhood. I got a few Mechanical Lego kits, more complex as I grew older. The kits came with very elaborated instructions booklets, which guided me through building a few different designs from each kit.

The kits contained gears of various sizes and shapes, including the flat gears we see here, in this forklift model. The kits also included shafts, fittings, joints and other parts, that enabled me to experiment with mechanical engineering, designing various simple machines, testing them out and improving (similar to what Mitch Resnick describes as "imagine-create-play-share-reflect" spiral, but with less sharing, as this was an individual activity mostly).

I especially liked to build steering mechanisms (you can see one in the picture, on the bottom-left side), which turned a circular motion into a straight motion, and that straight motion into change in angle of the wheels. When the vehicle drove and i steered it, I learned how the vehicle body acted when steering while driving forward and backward. Understanding these motions, not only in my mind, but also in my body, so to say, helped a lot when i learned to drive and had to deal with parallel parking.

Flint stone tools

I grew up next to a dry stream which probably saw many years of prehistoric human activity. Along the stream you could find many flint stone tools like those. I collected them, tried to use them and make more (which is very hard). In "gears of my childhood" the author speaks about how his love for gears based a model in his mind that later helped him cope with math. I do not know if I can find such a straight relation about flint stone tools. I do know this: tools can be created wherever you are, whatever you have.

Sinclair ZX Spectrum

When I was 12 or 13 I got my first computer – it was Sinclair ZX Spectrum. I learned to program it in Basic, and created all sorts of graphic and sound based programs. Getting games for it was not simple at all – I could buy games on tape cassettes, but that was expensive, so a few friends bought and shared printed magazines (no internet in the 80s) which had printed code of various games. I had to type in the code, run it, fix it and run it again. This experience taught me how to program.

4 "P"s and 1 "M"?

"Learning Creative Learning" is built upon the 4 "P"s: projects, peers, passion and play. From my personal experience, there is also much need in models - something to try and copy, in order to learn. I saw it with the mechanical Lego, using the instructions in the booklets to learn to build various components, such as steering wheel, on which I can later improvise, building my own ideas. Same thing was with my first computer, when I typed in hundreds lines of code in order to get computer games, while learning to program while doing so. I think this concept is also very powerful in Scratch, where you can take a game that you like (a model), and tweak it to learn how it works and how to make it do something different.

יום שלישי, 22 בינואר 2013

איך בונים שבילים?

בילינו את יום הבחירות בבניית שביל וערוגות בגינה. אז איך בונים שביל?
בשלב הראשון ניקינו את האדמה שעליה יעבור השביל וסימנו איפה אנחנו רוצים שהוא יהיה.
לאחר מכן הבאנו באמצעות מריצה חומר המשמש כמצע, כלומר, חומר שעליו יהיה השביל, ויחצוץ בינו לבין האדמה. המצע מיוצר על-ידי גריסה של אבן גיר, ויש בו גרגירים בגדלים שונים: אבנים קטנות, אך גם הרבה חומר אבקתי. כשמהדקים את המצע, הוא נדחס ושומר על צורה, מה שמאפשר להניח עליו בנוחות את אבני השביל.
את המצע הידקנו באמצעות מכבש קטן שבניתי מגליל בטון שמצאתי בבניין השכן ומוט ברזל שכופפתי.
על המצע המהודק פיזרנו שכבה של חול, על-מנת לתת לאבני השביל תמיכה יותר טובה.
אבני השביל עשויות אבן גיר מנוסרת. הנחנו אותן על המצע והשתדלנו שישלימו אחת את השניה וייצרו צורות יפות.
על האבנים פיזרנו עוד מצע, על-מנת שיחדור על ביניהן ויתמוך בהן. יש אפשרות גם לבטן את האבנים, אבל אנחנו החלטנו לא לעשות זאת, בינתיים.
השלמנו את העבודה בטאטוא השביל במטאטא כביש, והלכנו לישון שנת צהריים.

יום שישי, 18 בינואר 2013

איך עושים חור בחגורה?

ירדתי במשקל ונגמרו לי החורים בחגורה. בדרך כלל משתמשים במרצע, אבל אין לי כזה בהישג יד.
אז השתמשתי במקדחה עם מקדח רגיל (בטון).
בשלב הראשון מדדתי וסימנתי את המקום המיועד לחור. דפקתי על בורג באמצעות פטיש, על-מנת ליצור שקע קטן במקום הנכון.

עכשיו פשוט קדחתי את החור.
החור יצא חלק ושימושי.

יום רביעי, 27 ביוני 2012

איך ממציאים דברים עם ארדואינו?

עקרון הקוד הפתוח שינה את פני עולם התוכנה והקל על מליוני אנשים לכתוב תוכנה כאוות נפשם.
מזה כמה שנים שיותר ויותר אנשים מנסים לחולל מהפכה דומה בעולם החומרה: לאפשר לאנשים רבים ככל שניתן ליצור בעצמם, לעצמם, מכשירים שונים ומשונים, כשהם מתבססים על ידע וכלים שייצרו אנשי הקהילה.
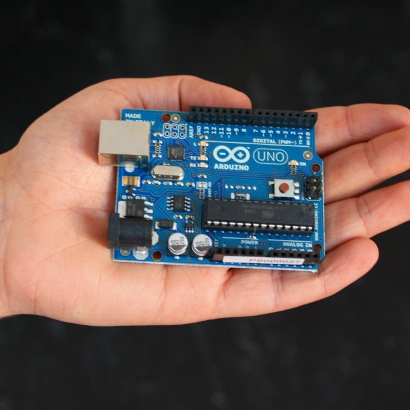
אחד מהכלים השימושיים ביותר לצורך זה הוא הארדואינו. זהו משטח קטן, אליו אפשר לחבר רכיבים אלקטרוניים, מעבדים, בקרים ומכשירים שונים.  את הארדואינו ניתן לתכנת במחשב הביתי, וכך ליצור מכשיר חכם.
בהרצאה הזו אפשר לראות שפע של דוגמאות יפות ומקוריות.

יום חמישי, 29 במרץ 2012

לגו אלקטרוני

מקסים! LittleBits הן אבני בניין קטנות, כמו לגו, אבל של אלקטרוניקה!

צפו בהדגמה: